I used almost all Tim Holtz die cuts, and painted them with iron paint and then rusted them. My favorite detail is the picture wheel. I scanned a black cut and made a digital template, then printed pictures on acetate. It is a time consuming project, but it is full of wonder and inspiration.
Showing posts with label Modern Masters. Show all posts
Steampunk Tissue Boxes
My studio met with a certain demise over a year ago, and since that time I have been focusing on my digital designs, until I could acquire a new building that won't fall prey to every little water disaster that comes my way. My husband and I went down to a cedar shed dealer where we ordered a custom building that will be delivered in a couple of weeks. It is 14x40 with 16ft of loft space, and I will have room to stretch out and be all kinds of messy, and still have enough space for workshops.
In the meantime, this is a favorite project that I left in my drafts folder, and thought it would be a great time to add something new (And knock that Christmas Tree off the front page!).
Labels:
Altered Art,
Chipboard,
die cut,
distressing,
Gears,
Modern Masters,
Patina,
picture wheel,
rubber stamping,
scrapbook layout,
Sizzix,
Spellbinders,
Staz On Ink,
Steampunk,
Tim Holtz,
Vintage
Vintage Trunk
I was especially proud of this project. It is a rather large trunk that I bought at the Craft Warehouse in Vancouver, WA. It was on sale, but still a pretty penny. I thought this wooden box would take a lot longer to complete, but I actually finished it in a day.
I painted the box frame with Modern Masters, to create this great rust effect. I used paper from a steampunk theme cardstock pack from the Hobby Lobby, and used the Cricut to cut out his monogram for the top, which I wanted to fit into the white space.
The front is a stencil that I made with my Cricut (Indie Art, I believe) and stencil sheets from the Hobby Lobby. I rubber stamped his birthday in the crest just to make it personal.
The inside is from the same paper stack, and really not that hard to cut it to size. This is another one of those stack-able projects. Some things need to be simple, so they are not just clutter and dust collectors. Keep it simple and it will last forever.
Thrift Store Upcycle
I found this really cheap, fake wood table at a thrift store for $14. It took a lot of work, but I prepped the surface by lightly sanding it, then gave it a primer coat. I applied a lot of layers of iron paint to it and left it in the rain for a while to give it a really old look. It still needs handles, but I can't decide to actually order the specialty size online. Hobby Lobby doesn't have the right size handles. It was easier to get a tetanus shot than to take the time to seal it nice and proper. The sealing process takes some of the depth of color away. I'll get to it.
Labels:
distressing,
Modern Masters,
Patina,
Rust,
Upcycled Furniture,
Vintage,
Weathered
Create your Desire
I am a huge fan of subliminal persuasion, and having simple phrases on my wall helps me get through the day. Build the life you dreamed of. I don't know about you, but I need daily reminding that it is ok to pursue my dreams.
Get in your studio and CREATE!
Sizzix aplhabets Serif Essentials and Block Talk. Embossing powder and random stamps from Michael's Flower dies by Impression Obsession and Sizzix. Frame has a 12x12 opening that fits scrapbook paper perfectly; from the Craft Warehouse. Martha Stewart craft paint- champagne and penny. Rust effect is Modern Masters paint.
Labels:
3D flowers,
Altered Art,
distressing,
dyed lace,
Home Decor,
Impression Obsession,
Mixed Media,
Modern Masters,
scrapbooking,
Sizzix,
Staz On Ink,
Vintage,
Wall Hanging
Rusty Laugh
These chipboard wall hangings are so amazing to work with. They are tedious in their process because you have to get in the grooves, and don't forget to do the back too! They are made of layered chipboard, which I found at Hobby Lobby on sale for about $3. They make really great gifts because they don't take up space, and who doesn't love a positive subliminal message to plant in their mind every day? My house is filled with handmade subliminal persuasion. That's how I stay positive in the midst of all my personal hardships.
This is a quick view of part of the rusting process. You seal your substrate with the primer, then paint on one coat of the black iron paint and let dry. Then you paint on another coat, and while that is still wet, you strategically dampen it with the activator solution. I get my results from a pooling effect. Some kits come with spray bottles, but I find that doesn't give me what I want. I want it to look a thousand years old! After that dries, I cheat and wet it with water, and add a spotty layer of black iron paint again, then soak that with more solution. I usually do multiple pieces at once so I can stack them on top of each other. That is how I get the added texture. The process takes a few days if you want it to have this level of erosion. Once the rust is taken hold, I start to add the bronze and gold paint for the patina to show through. If you don't have the patina, the piece looks really orange and pure rust. Personal choice!
Steampunk Cigar Box
Next in my rust and patina series is a couple of cigar boxes. Remember how much we loved to turn them into purses? I love these boxes! I use them to store my sewing supplies and notions; easy to carry around, and they look pretty when I just leave them sitting around for months. I am a slob =)
I am using Modern Masters paint to create this REAL rust and patina effect. I cut out chipboard with my Sizzix machine and dies, and gave them a nice protective coat of paint before swishing them around in the activator solution. Everything is applied with a basic craft glue, nothing fancy, and the inside is scrapbook paper made by Graphic 45.
This one is my favorite! It was a Christmas gift, but maybe I can make another one for myself :)
I have several more projects using the rust and patina process. I will make a point to start a tutorial when I get my blog all caught up.
I found a cigar box on sale for $3.59 at the Craft Warehouse in Vancouver. I bought 3 of them, and painted two for Christmas gifts.
Tim Holtz Alterations dies: Hardware Findings, Weathered Clock (hands), Gadget Gears, Spellbinders Sprightly Sprockets,
Thank you for stopping by!
Labels:
Altered Art,
Chipboard,
Cigar Box,
Cogs,
Gears,
Graphic 45,
Mixed Media,
Modern Masters,
Painting,
Patina,
Rust,
scrapbooking,
Sizzix,
Spellbinders,
Steampunk,
Tim Holtz Alterations,
Vintage,
Weathered
Adore - Wall Hanging
Keeping up with the constant changing tech is as much work as learning new tricks and techniques. I have been offline for quite some time after Blogger updated pretty much everything. My meticulously designed blogwear was erased and I couldn't spare the time to learn the new system. As it turns out, it is so incredibly simple, I just had to stop overthinking it!
This piece is one of several items that I used Modern Masters rust and patina to create. At this time, I just want to grab projects that I can post immediately, just to throw some inspiration out there. In the next weeks I hope to provide much more information on my tools and techniques. I have many projects already completed, I just need to set up a photography corner.
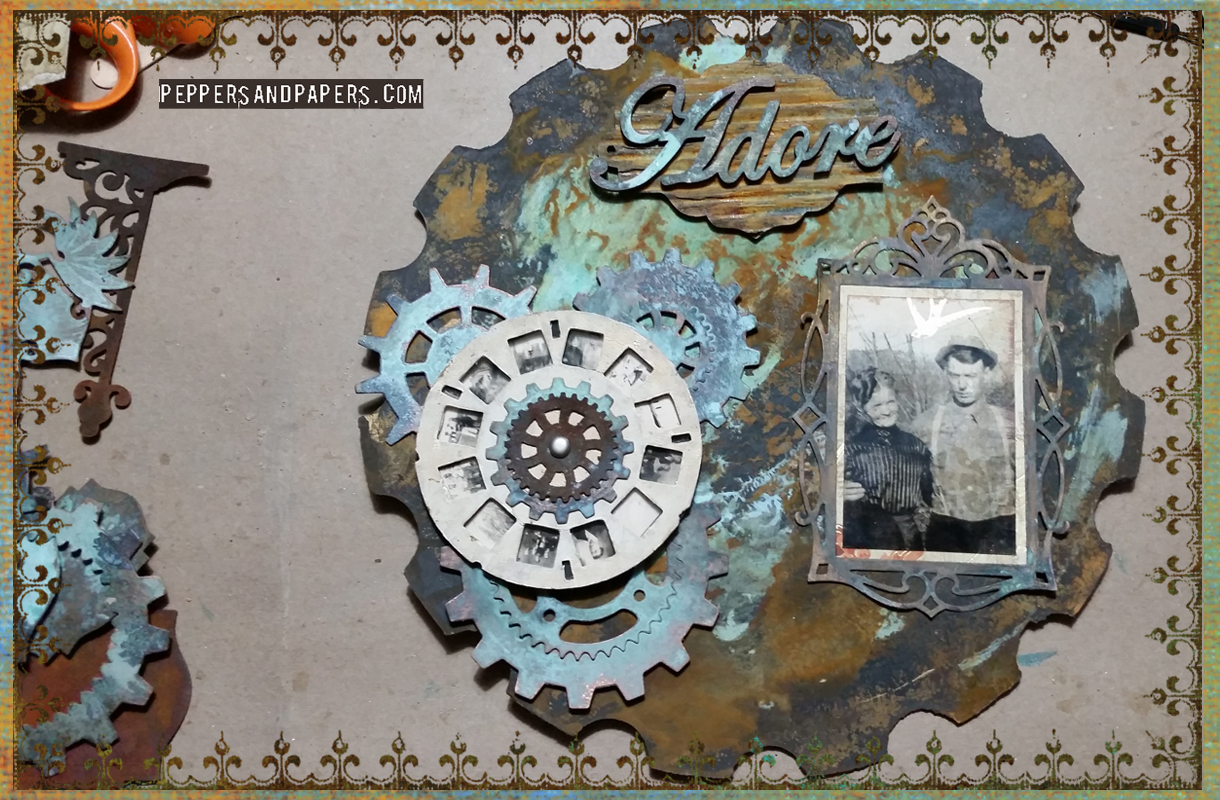
Adore - Wall Hanging is a matboard cutout, a technique I fine tuned on the Cricut. The pinwheel is a Tim Holtz die cut- cardboard, the gears are Spellbinders and Sizzix dies, the photo frame is a Sizzix die, and Adore is a laser cut out, matted on cardboard cut with a Tim Holtz frame die. All the pieces are colored with a real rust and patina process, so get your tetanus! The photograph is my immigrant great, great, grandparents from Sweden. They homesteaded in Bellingham, WA in the early 1900's. The picture is covered with a stamped piece of acetate, a technique I like to use on non framed pieces to protect the photograph. The idea was to give it a digitally processed appeal.
If you think it looks like metal, then I thank you! It is actually whispy lightweight, and I will probably mount it on a canvas to continue a heritage series I will be sharing soon.
Thank you for stopping by!
Subscribe to:
Posts (Atom)