Showing posts with label Cricut. Show all posts

Vintage Trunk

 I was especially proud of this project. It is a rather large trunk that I bought at the Craft Warehouse in Vancouver, WA. It was on sale, but still a pretty penny. I thought this wooden box would take a lot longer to complete, but I actually finished it in a day.


I painted the box frame with Modern Masters, to create this great rust effect. I used paper from a steampunk theme cardstock pack from the Hobby Lobby, and used the Cricut to cut out his monogram for the top, which I wanted to fit into the white space. 


The front is a stencil that I made with my Cricut (Indie Art, I believe) and stencil sheets from the Hobby Lobby. I rubber stamped his birthday in the crest just to make it personal. 


The inside is from the same paper stack, and really not that hard to cut it to size. This is another one of those stack-able projects. Some things need to be simple, so they are not just clutter and dust collectors. Keep it simple and it will last forever.

Peacock Peace

Continuing with my Peacock journey, I created this little piece last year and gave it away as a gift. It is really very simple, but ornate. I don't really like the smaller pieces that are so popular these day, because I want my story to take over the entire wall. But they make wonderful little gifts!


This fun little canvas is 5x7, and I used the Spellbinders Jewel Fantasies and Jewel Keys die set, along with the Cricut Art Nouveau. I found a large earring at Joann's and used it for the feather. The label is cut with the Tim Holtz Tag & Bookplates die. I used metallic paints to color th eaccents, and jewels to fill the feather tail. I do love my die cuts!


Alluring

I went on a crazy peacock phase a couple years ago, then went on a cutting spree with my Cricut. Originally this was not going to be a hombre type painting, I switched gears half way through and decided the peacock in the tree needed a blue sky! This painting hangs in my hallway so I can see it when I come up the stairs. It sits under a solar light tube, so it reflects the sun off the glass in the sky. It truly is Alluring. The gold mica flakes simulate falling leaves.


 I love the reflective nature of the Shimmer paper by DCWV, and the mica flakes from Micheal's. The base paints are Lumiere fabric paint, also metallic, but then I use pretty much nothing else! The peacock tail is filled in with stickles by Ranger.


  The wings are a beautiful set from Cheery Lynn Designs. It is a left and right, large and small set, and I LoOOove them!! You can see the details yourself!


The Alluring is from a Tim Holtz Bigz Block Talk alphabet set, I cut multiple layers of chipboard and layered them for dimension. The paint is Viva Precious Metal Colour, a wonderfully expensive metallic paint that is rather difficult to find, but Joann.com sells most of the colors. 


I am ever so pleased with the clever use of re-purposed treasures for my pieces. The branch is the Tim Holtz Bird Branch die, that I cut out the packaging of the die, with the die. Then painted the underside with Viva Stamp Paint, which offers texture, and the top is glossy. Or you can flip it for the texture up, I go both ways. You can see where I built the tree out of the single branch die.


One of my favorite techniques is using Golden Gel Medium from Amazon or Michael's and mixing a batter of translucent beads and blue and green cello glitter. This mixture also contains blue and green beach glass that I smashed to bits. The silver tube beads are a bit like rain drops, but only if you are thinking that when you drop them in the batter!


 The gel medium acts as a glue, so it is a really valuable tool for working on canvas. The base is textured with Liquitex Natural Sand mixed with paint, then watered down metallic paint for the blended effect.


I linked the stores that I buy most of my materials from. 

Thank you for stopping by!!


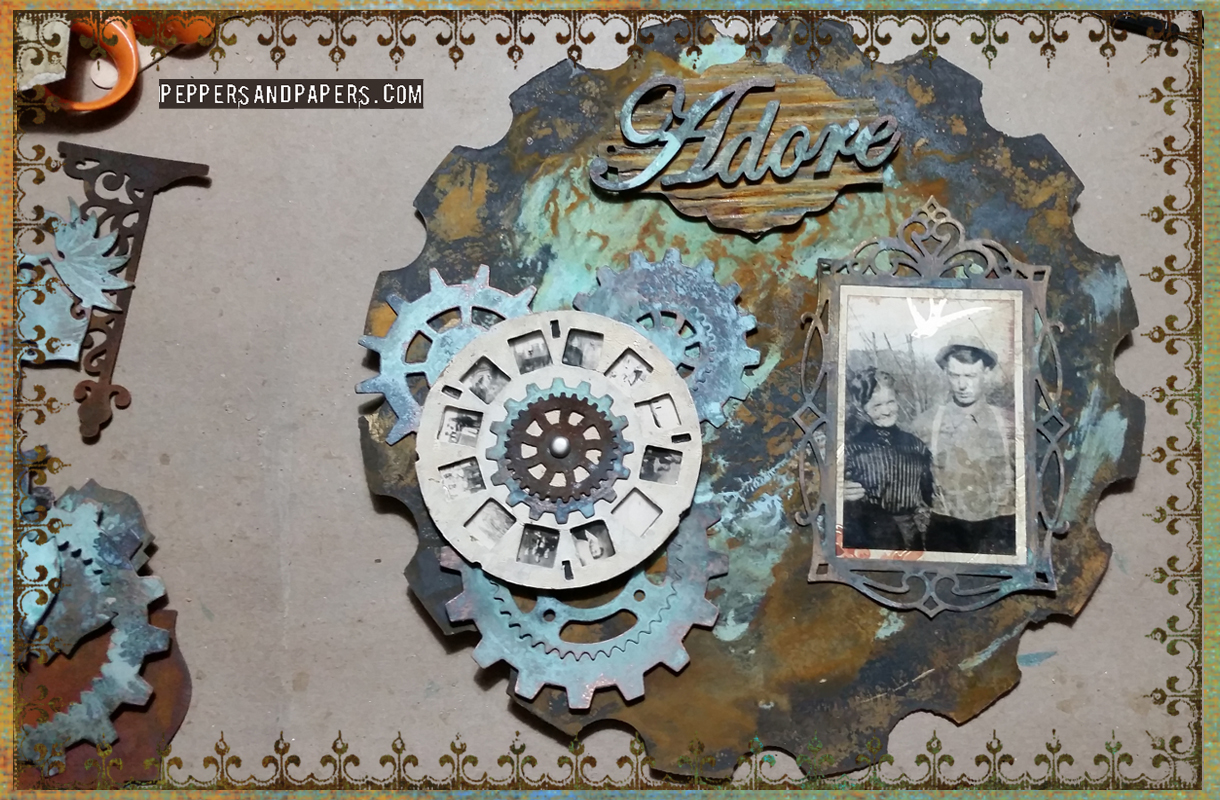
Adore - Wall Hanging

Keeping up with the constant changing tech is as much work as learning new tricks and techniques. I have been offline for quite some time after Blogger updated pretty much everything. My meticulously designed blogwear was erased and I couldn't spare the time to learn the new system. As it turns out, it is so incredibly simple, I just had to stop overthinking it! 

This piece is one of several items that I used Modern Masters rust and patina to create. At this time, I just want to grab projects that I can post immediately, just to throw some inspiration out there. In the next weeks I hope to provide much more information on my tools and techniques. I have many projects already completed, I just need to set up a photography corner.

Adore - Wall Hanging is a matboard cutout, a technique I fine tuned on the Cricut. The pinwheel is a Tim Holtz die cut- cardboard, the gears are Spellbinders and Sizzix dies, the photo frame is a Sizzix die, and Adore is a laser cut out, matted on cardboard cut with a Tim Holtz frame die. All the pieces are colored with a real rust and patina process, so get your tetanus! The photograph is my immigrant great, great, grandparents from Sweden. They homesteaded in Bellingham, WA in the early 1900's. The picture is covered with a stamped piece of acetate, a technique I like to use on non framed pieces to protect the photograph. The idea was to give it a digitally processed appeal.

If you think it looks like metal, then I thank you! It is actually whispy lightweight, and I will probably mount it on a canvas to continue a heritage series I will be sharing soon. 

Thank you for stopping by!