Showing posts with label Painting. Show all posts

O Christmas Tree!

How I love your snow covered branches!


I needed a nice large size painting for the Christmas and Winter season, so I made one using Golden Fiber Paste and various acrylic paints. I used seed beads for the texture of the tree, and made a white snow out of cello flakes, glitter glue, and Tri-Art Liquid Mirror paint. The star is from the bead department at Joann's, and I used Precious Metals by Viva Decor. 


Alluring

I went on a crazy peacock phase a couple years ago, then went on a cutting spree with my Cricut. Originally this was not going to be a hombre type painting, I switched gears half way through and decided the peacock in the tree needed a blue sky! This painting hangs in my hallway so I can see it when I come up the stairs. It sits under a solar light tube, so it reflects the sun off the glass in the sky. It truly is Alluring. The gold mica flakes simulate falling leaves.


 I love the reflective nature of the Shimmer paper by DCWV, and the mica flakes from Micheal's. The base paints are Lumiere fabric paint, also metallic, but then I use pretty much nothing else! The peacock tail is filled in with stickles by Ranger.


  The wings are a beautiful set from Cheery Lynn Designs. It is a left and right, large and small set, and I LoOOove them!! You can see the details yourself!


The Alluring is from a Tim Holtz Bigz Block Talk alphabet set, I cut multiple layers of chipboard and layered them for dimension. The paint is Viva Precious Metal Colour, a wonderfully expensive metallic paint that is rather difficult to find, but Joann.com sells most of the colors. 


I am ever so pleased with the clever use of re-purposed treasures for my pieces. The branch is the Tim Holtz Bird Branch die, that I cut out the packaging of the die, with the die. Then painted the underside with Viva Stamp Paint, which offers texture, and the top is glossy. Or you can flip it for the texture up, I go both ways. You can see where I built the tree out of the single branch die.


One of my favorite techniques is using Golden Gel Medium from Amazon or Michael's and mixing a batter of translucent beads and blue and green cello glitter. This mixture also contains blue and green beach glass that I smashed to bits. The silver tube beads are a bit like rain drops, but only if you are thinking that when you drop them in the batter!


 The gel medium acts as a glue, so it is a really valuable tool for working on canvas. The base is textured with Liquitex Natural Sand mixed with paint, then watered down metallic paint for the blended effect.


I linked the stores that I buy most of my materials from. 

Thank you for stopping by!!


Great Performance!

This was a fun piece to put together. At the time, the wings were new to me, and I was on a fanatic dress form spree. The week I made this one, an actor friend was having a performance at his school and I was inspired by the intrigue of it all. Jesse got a standing ovation from me! One day when he makes it big in Hollywood, I will always have this piece of him from the past. Yes, he's a guy and this is a girl thing...I did use blue...


You can find them at Michael's and Joann's stores, or here online.
The larger gear is from Cricut.com


Vintage Flair Jewelry Box

 I made this jewelry box for my mother a couple of years ago.  I am especially proud of it because it is so perfectly suited for her. I get my creative edge from my mom. When I was young, we were dirt poor, and she was always bringing home garbage and turning it into furniture, gifts, or decorations. She was amazing. Even as a child, I was really awe inspired by her ability to re-purpose garbage. This was in a time when taking home garbage was not considered a true credit to one's household! She filled our little apartment with the splendors of the world. There was a cable spool that she turned into a coffee table. She stained it, and filled the cracks with sea shells and macrame' trim, then sealed it with epoxy. She made turtle pillows to sit on, around that little table...turtles!!! She made planters out of old pop cans, and the list goes on. I have learned to see the garbage of human kind as an opportunity to stand apart from the norm. Thinking outside the box. I still offer a home to many of the things that she made, or fixed up, for my tiny pink childhood bedroom. This box however, is a store bought box from the Craft Warehouse. She would never accept a store bought gift, so I had to really age it, to sell her on the concept that it is a true gift. The top of the box is my favorite, because of my memories of her taking me to ballet class.


Unless you meticulously paint an intricate box like this, you can't know how hard it was to not ruin that mirror! The inserts slid in nicely, and I gave the entire box a nice coat of something that deactivates the rust and patina. I also put a clear coat of mod podge on the paper.


Did I mention this is real rust and patina? That's because I know you will scroll down to see the other projects. Eventually you will see a clear picture.

There is no photograph on this project, but I still call it "Memory Art" because I harnessed a particular time in my life, which was living in Mount Vernon, WA. My brother had just been diagnosed with cancer, and my mom put in some extra mom hours to make me feel special. One of those special gifts was a pretty pink jewelry box with a dancing ballerina in it.


The Family

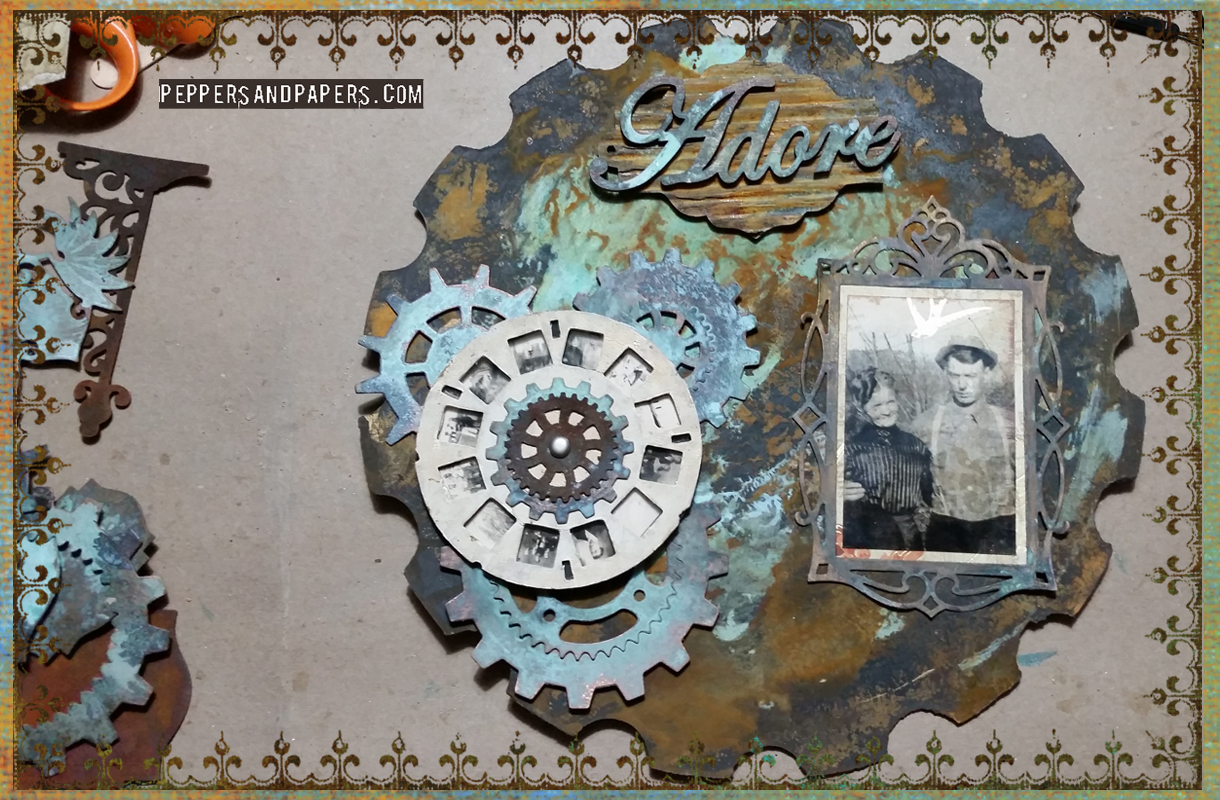
This is one of my favorite photo's of my dad and his two brothers and sister. My father is the little cutie on the top right, "Freddie". This canvas was inspired by the hardship my grandmother faced while raising four children at such a young age, in the aftermath of the Great Depression. Their father was not around much and she had to fend for herself, carving out a pattern of survival skills that I have found invaluable during the last few years of my own personal hardships. Remember the stories your grandparents tell you, because they are trying to teach you something!


I chose this quote because we take our hits, then we dance on.


This is a laser chipboard cut, and the butterfly is a Spellbinders die cut, and various metal findings.


The bird and branch is a Tim Holtz Alteration die, bird branch. I cut it out with chipboard, then layered it for depth. My grandmother loved the birds.


The cogs are another Tim Holtz Alterations die, and a few metal pieces placed strategically. The fence is a laser wood cut from Michael's. The grass is a Cheery Lynn Designs die cut that I painted with texture paint.  


My grandmother had the all American home when I was growing up. Simple and maintained with love. She didn't have a fence, but she had a beautiful enclosed patio. I aspire to have one of my own.

The paint is a real rust and patina paint and solution. I then stenciled on a brick texture using fiber paste and a brick template stencil. After that cured, I applied a new layer of rust and patina.


More hardware findings by Tim Holtz Alterations. Cut out with chipboard and painted, then soaked in a tub of activator solution and enclosed and shaken on occasion until I was satisfied with the depth of color.


The quotes are stamped with Stampers Anonymous stamps, by Tim Holts. I can't read the side poem anymore! I used StazOn ink on acetate, then adhered with Crackle Accents glue.


The knob is packed by Tim Holtz, and dropped in the tub of solution with the hinges, gears, cogs, and metal accents.


I will have one more 12x12 thick canvas that I will post next.

Thank you for stopping by! 

Homestead

These are my immigrant great-great-grandparents from Sweden. They arrived in Minnesota in the 1880's. My great-great-grandmother, Ida, worked at a hotel to pay for her passage to America. I don't know when they met, but they set up a homestead in Bellingham, WA in the early 1900's. This picture really speaks to me as the American dream. I imagine they saved every penny they had to build this small home. They raised three children, and thrived here for some time.


 This is the first in my homestead series, which is a collection of thick 12x12, mixed media canvas. Something I like to call "Memory Art".


The image is printed on acetate and mounted on a lightly patterned paper. I cropped the house out by hand and mounted it on a 5x7 flat canvas that I had pre-painted with a rust and patina process.


The key, and Home, and fence are laser cut outs I found at Michael's. The grass is a die by Cheery Lynn Designs that I painted with a textured paint.


This is a Tim Holtz brand hardware knob that I bought at JoAnns. I let it soak in the rusting solution for the night to give it this aged and weathered look.


While the solution is still wet, I place bottles or jars on the canvas until it is dry, that is how I get the rings. 


Thank you for stopping by. I have another 12x12 canvas that I am really excited to share.


Steampunk Cigar Box

Next in my rust and patina series is a couple of cigar boxes. Remember how much we loved to turn them into purses? I love these boxes! I use them to store my sewing supplies and notions; easy to carry around, and they look pretty when I just leave them sitting around for months. I am a slob =)


I am using Modern Masters paint to create this REAL rust and patina effect. I cut out chipboard with my Sizzix machine and dies, and gave them a nice protective coat of paint before swishing them around in the activator solution. Everything is applied with a basic craft glue, nothing fancy, and the inside is scrapbook paper made by Graphic 45. 


This one is my favorite! It was a Christmas gift, but maybe I can make another one for myself :)


I have several more projects using the rust and patina process. I will make a point to start a tutorial when I get my blog all caught up.

I found a cigar box on sale for $3.59 at the Craft Warehouse in Vancouver. I bought 3 of them, and painted two for Christmas gifts.

Tim Holtz Alterations dies: Hardware Findings, Weathered Clock (hands), Gadget Gears, Spellbinders Sprightly Sprockets, 

Thank you for stopping by!

Adore - Wall Hanging

Keeping up with the constant changing tech is as much work as learning new tricks and techniques. I have been offline for quite some time after Blogger updated pretty much everything. My meticulously designed blogwear was erased and I couldn't spare the time to learn the new system. As it turns out, it is so incredibly simple, I just had to stop overthinking it! 

This piece is one of several items that I used Modern Masters rust and patina to create. At this time, I just want to grab projects that I can post immediately, just to throw some inspiration out there. In the next weeks I hope to provide much more information on my tools and techniques. I have many projects already completed, I just need to set up a photography corner.

Adore - Wall Hanging is a matboard cutout, a technique I fine tuned on the Cricut. The pinwheel is a Tim Holtz die cut- cardboard, the gears are Spellbinders and Sizzix dies, the photo frame is a Sizzix die, and Adore is a laser cut out, matted on cardboard cut with a Tim Holtz frame die. All the pieces are colored with a real rust and patina process, so get your tetanus! The photograph is my immigrant great, great, grandparents from Sweden. They homesteaded in Bellingham, WA in the early 1900's. The picture is covered with a stamped piece of acetate, a technique I like to use on non framed pieces to protect the photograph. The idea was to give it a digitally processed appeal.

If you think it looks like metal, then I thank you! It is actually whispy lightweight, and I will probably mount it on a canvas to continue a heritage series I will be sharing soon. 

Thank you for stopping by!


Memory Box

This is a paper mache box that I bought several years ago. I gave it a crackle finish using acrylic paint, then it sat for a very long time until I needed somewhere clever to put little trinkets in my living room. The top is a bit dainty and fragile, but the entire piece inspires me, despite it being decorated with paper. It has been several years now, and it held up. The legs make it feel like a wonderful piece of decor, and somehow reduces dust. 


I made the rosettes out of double faced satin ribbon that I had dyed. The feet are by Tim Holtz and applied with basic craft glue. The red rose trim is a purchase from a scrapbook convention.


I used graphic 45 paper, Cheery Lynn Designs dies, and made the flowers are Tim Holtz dies, and Spellbinders dies.


I used Sizzix, Spellbinders, Cheery Lynn, and Memory Box dies.


Graphic 45 papers


The individual pieces are all hand or die cut, hand painted, or dyed.